Studio Notes: Four Short Experiments to Build a Modular Windowsill Plant Stand
Opening observation: the narrow strip of light at the kitchen window often becomes the best small garden in the house and yet is one of the hardest corners to organize. The question I set out to test in these studio notes was simple: can a modular, low-cost plant stand be built in short experiments so it can change with seasons, plants, and routines? Over three weekends I tried four small approaches, tracking materials, steps, and real use. Below are the experiments, the process for each, and what each revealed in practice.
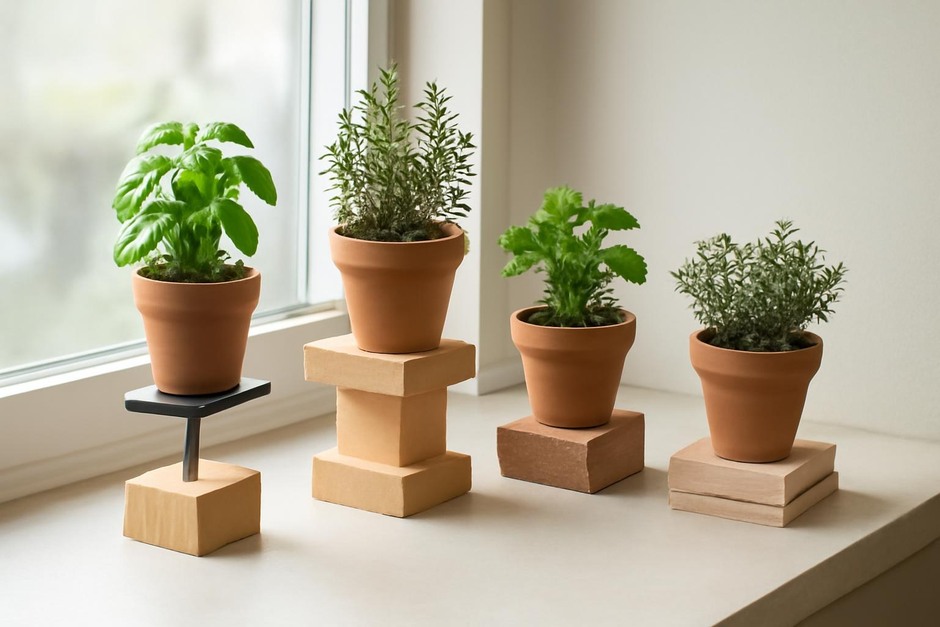
1. Upcycled Crate Risers: stacked, adjustable, forgiving
Materials
- Small wooden fruit crates (or reclaimed wood pieces)
- Sandpaper, wood glue, a few screws
- Felt pads for the base
Process
- Clean and sand crates; reinforce joints with glue and a couple of screws where needed.
- Decide on heights and stack configurations; test stability with a level and felt pads to protect the sill.
- Place pots and swap configurations to match the light gradient.
Notes: This was the quickest to assemble and the most forgiving. The crates are lightweight and easy to reconfigure when one plant wants more sun. They also offer hidden storage for seed packets. Downsides: wood can warp if overwatered and the aesthetic is casual rather than refined.
2. Thin Floating Shelf: a neat ledge with low visual weight
Materials
- Thin pine board or repurposed shelf panel
- Short L-brackets or floating-shelf hardware
- Drill, screws, wall anchors (if needed)
Process
- Measure available depth and mark stud positions. Cut board to length and finish with oil or paint.
- Attach brackets to the wall at the same height; mount the shelf and check level.
- Arrange a single row of pots or stagger small saucers for drainage.
Notes: The floating shelf brings plants closer to eye level and clears sill space for jars or tea things. It feels cleaner visually and is especially good for trailing plants. Installation requires a little more precision and commitment—once mounted, it’s less mobile than crates.
3. Magnetic Mini-Planters: a light-touch vertical experiment
Materials
- Small metal strip (steel, mounted to wall or the side of a fridge-like surface)
- Small pots with glued-on rare-earth magnets or purpose-made magnetic pots
- Waterproof glue and a silicone mat
Process
- Attach the metal strip at the desired height; clean surfaces thoroughly.
- Glue magnets to the backs of lightweight pots; allow full cure time.
- Arrange pots on the strip and monitor that each magnet holds under the weight of soil plus water.
Notes: This is the most playful option and creates a vertical row that saves sill space. It’s great for small succulents and seedling flats. Watch weight limits—heavy, water-filled pots will slip. Also, magnetic arrangements invite frequent rearrangement, which was nice for testing how plants responded to different light angles.
4. Ceramic Tile Risers & Pegboard Grid: modular, sturdier, customizable
Materials
- Ceramic tiles (for stable risers) and cork pads
- Thin pegboard mounted behind the sill; peg hooks and small brackets
- Adhesive felt, small silicone saucers
Process
- Mount a narrow pegboard section and test hook positions; set tiles on cork pads to form risers at staggered heights.
- Hang a couple of light planters and place tiles for heavier pots. Use peg hooks to suspend tools or labels.
- Adjust spacing to make the most of morning light and to allow airflow between pots.
Notes: This hybrid system felt most intentional and durable. Tiles give stability and easy cleanup; the pegboard lends flexibility for hanging and accessory storage. It requires more initial effort but rewarded with a tidy, adaptable display.
Measured conclusion and short review
Review: each experiment served a different purpose. The upcycled crates won for speed and charm; the floating shelf for neatness and display; the magnetic planters for vertical economy and play; the tile-and-pegboard system for long-term stability and modularity. If you want a quick, changeable solution, start with crates. If you prefer a polished look, invest the time in a floating shelf or tile grid. Across all experiments, practical details mattered most: protect surfaces from water, test weight limits, and think about how you water—saucers or trays save hassle.
Next steps I plan to try: a hybrid using a shallow floating shelf over a crate base, and a simple removable drip tray that can be slid out for cleaning. For readers trying these, my compact checklist would be: measure light, choose materials that tolerate moisture, test stability before filling with soil, and expect to iterate. These short experiments show that a humble windowsill can be both functional and adaptable when you treat the space like a small studio project rather than a final purchase.